


Онлайн
Alvaros
.
- Регистрация
- 14.05.16
- Сообщения
- 21.452
- Реакции
- 101
- Репутация
- 204
Привет Хабр.
Платы ESP32 весьма популярны в виду низкой цены, неплохой вычислительной мощности (процессор 200МГц), развитого SDK с поддержкой как MicroPython так и Arduino IDE, наличием GPIO c поддержкой периферии (SPI, I2C и пр) и беспроводной связи (WiFi, Bluetooth). Сегодня мы посмотрим, что можно сделать на такой плате ценой всего лишь около 12$.
Мы рассмотрим разные варианты использования WiFi, от простого коннекта к сети до WiFi-сниффера. Для тестов понадобится любая плата с ESP32 (лучше с OLED-экраном, как на картинке) и Arduino IDE.
Для тех кому интересно как это работает, продолжение под катом.
Я не буду писать, как подключить библиотеки ESP32 к Arduino IDE, желающие могут посмотреть
Теперь приступим к коду. Все примеры кода полностью готовы к использованию, их можно просто скопировать и вставить в Arduino IDE.
1. Подключение к WiFi и получение точного времени
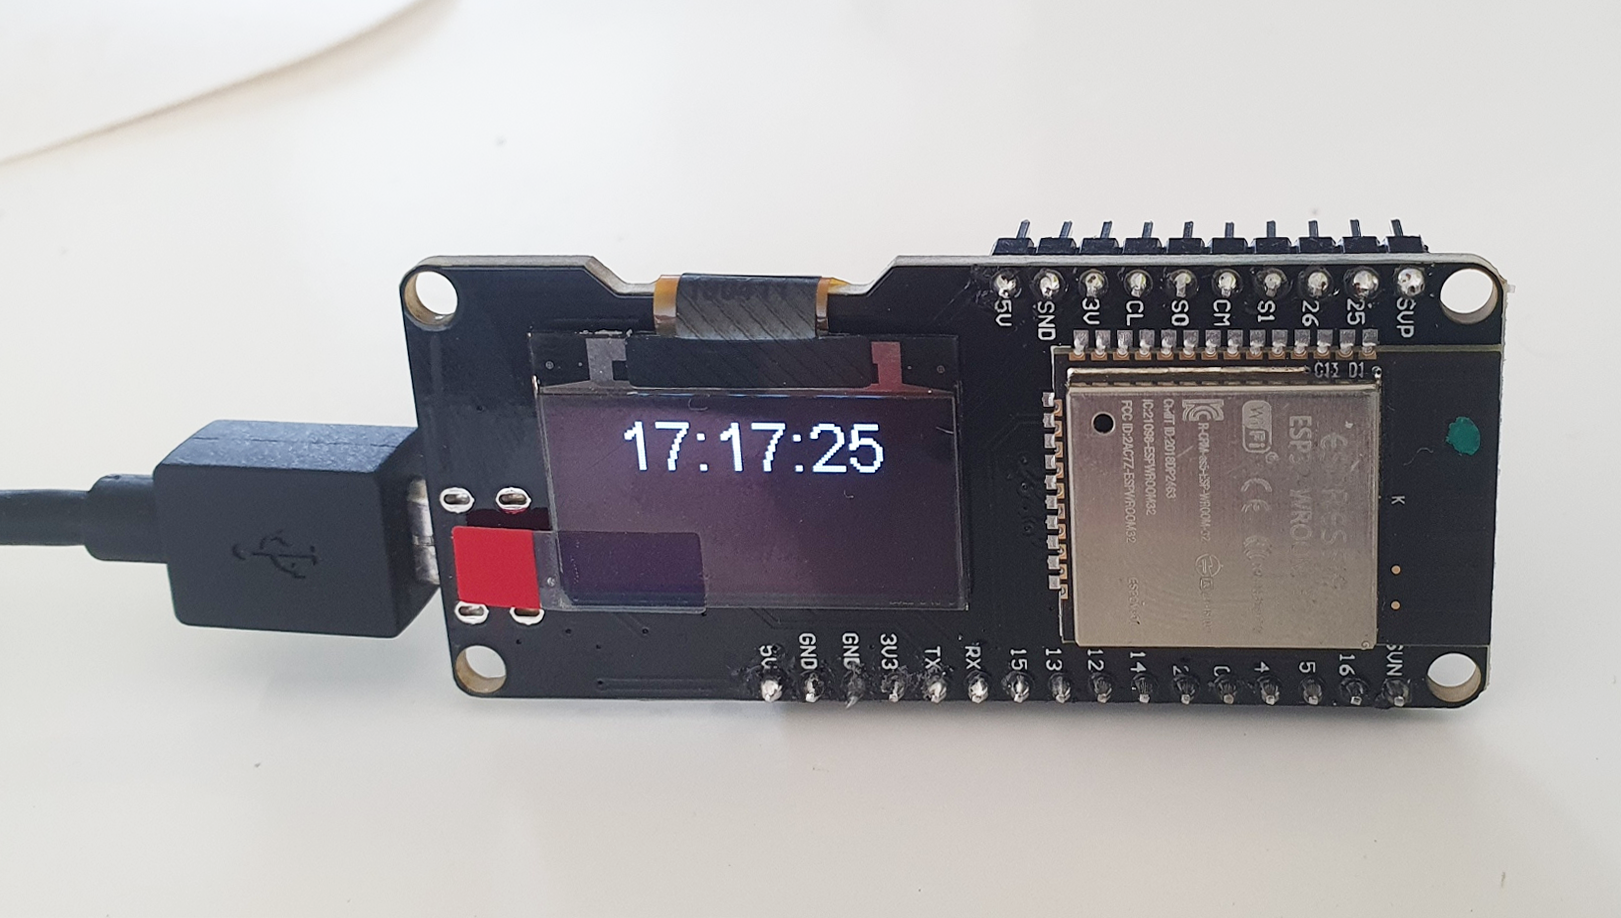
Раз уж на плате есть WiFi, самое простое что мы можем сделать, это подключиться к существующей WiFi-сети. Это общеизвестно, и работало еще на ESP8266. Однако просто так подключиться и ничего не делать неинтересно, покажем как загрузить точное время по NTP. С помощью нижеприведенного кода нашу плату с ESP несложно превратить в настольные (или для гиков 100lvl наручные") часы.
часы.
Код довольно прост, интересно что поддержка NTP уже встроена в стандартные библиотеки, и ничего доустанавливать не нужно. Для работы OLED-экрана нужно установить библиотеку
Переменные ssid и password нужно будет заменить на параметры реальной точки доступа, в остальном, все работает «из коробки».
#include
#include
#include
const char* ssid = "MYWIFI";
const char* password = "12345678";
const char* ntpServer = "pool.ntp.org";
const long gmtOffset_sec = 3600;
const int daylightOffset_sec = 3600;
// OLED Display 128x64
SSD1306Wire display(0x3c, 5, 4);
void setup() {
Serial.begin(115200);
delay(10);
Serial.println('\n');
WiFi.begin(ssid, password); // Connect to the network
while (WiFi.status() != WL_CONNECTED) { // Wait for the Wi-Fi to connect
delay(500);
Serial.print('.');
}
Serial.println('\n');
Serial.println("Connection established");
Serial.print("IP address:\t");
Serial.println(WiFi.localIP());
// Get the NTP time
configTime(gmtOffset_sec, daylightOffset_sec, ntpServer);
// OLED display init
display.init();
display.clear();
display.setTextAlignment(TEXT_ALIGN_LEFT);
display.setFont(ArialMT_Plain_10);
display.drawString(0, 0, "Access Point connected");
display.drawString(0, 24, "AP IP address: ");
display.drawString(0, 36, WiFi.localIP().toString());
display.display();
delay(1000);
}
void draw_time(char *msg) {
display.clear();
display.setTextAlignment(TEXT_ALIGN_CENTER);
display.setFont(ArialMT_Plain_24);
display.drawString(display.getWidth()/2, 0, msg);
display.display();
Serial.println(msg);
}
void loop() {
struct tm timeinfo;
if (getLocalTime(&timeinfo)) {
char time_str[16];
strftime(time_str, 16, "%H:%M:%S", &timeinfo);
draw_time(time_str);
}
delay(500);
}
2. WiFi точка доступа
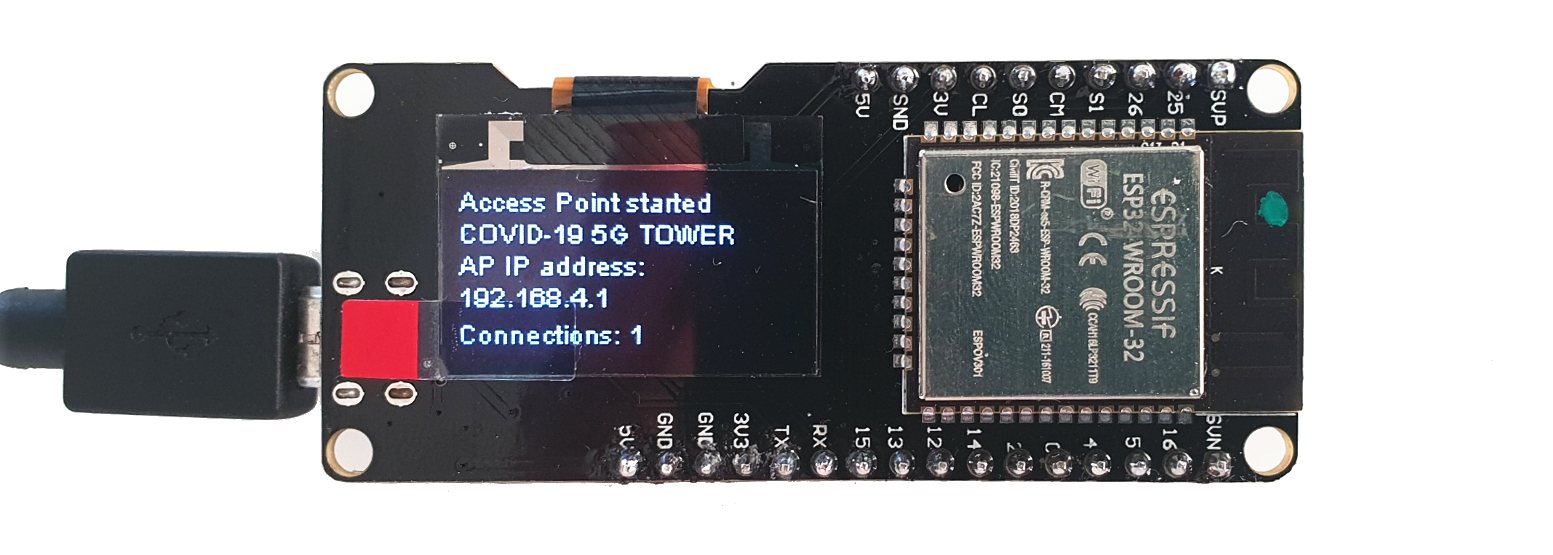
Разумеется, мы можем не только подключиться к точке доступа, но и создать свою. В данном примере мы запустим мини веб-сервер, открый который можно например, со смартфона. Отдельно можно отметить обработку события SYSTEM_EVENT_AP_STACONNECTED, что позволяет узнать, сколько клиентов подключалось к нашей точке доступа.
Фото того, как это работает, показано на КДПВ.
#include
#include
#include
// Access Point credentials
const char *ssid = "TEST-123";
const char *password = NULL; // "12345678";
int connections = 0;
// Onboard WiFi server
WiFiServer server(80);
String responseHTML = "DOCTYPE html>"
""
""
"
ESP32 Web Server
"
"
Hello World
"
"";
// OLED Display 128x64
SSD1306Wire display(0x3c, 5, 4);
void WiFiStationConnected(WiFiEvent_t event, WiFiEventInfo_t info){
connections += 1;
showConnectionsCount();
}
void showConnectionsCount() {
char data[32];
sprintf(data, "Connections: %d", connections);
draw_message(data);
}
void setup() {
Serial.begin(115200);
Serial.println();
Serial.println("Configuring access point...");
// Start access point
WiFi.mode(WIFI_AP);
WiFi.softAP(ssid, password);
WiFi.onEvent(WiFiStationConnected, SYSTEM_EVENT_AP_STACONNECTED);
IPAddress ip_address = WiFi.softAPIP(); //IP Address of our accesspoint
// Start web server
server.begin();
Serial.print("AP IP address: ");
Serial.println(ip_address);
// Oled display
display.init();
// Draw info
display.clear();
display.setTextAlignment(TEXT_ALIGN_LEFT);
display.setFont(ArialMT_Plain_10);
display.drawString(0, 0, "Access Point started");
display.drawString(0, 12, ssid);
display.drawString(0, 24, "AP IP address: ");
display.drawString(0, 36, ip_address.toString());
display.display();
// Total number of connections
showConnectionsCount();
}
void draw_message(char *msg) {
display.setColor(BLACK);
display.fillRect(0, 50, display.getWidth(), 12);
display.setColor(WHITE);
display.drawString(0, 50, msg);
display.display();
Serial.println(msg);
}
void loop() {
WiFiClient client = server.available(); // Listen for incoming clients
if (client) { // If a new client connects,
draw_message("Client connected");
String currentLine = ""; // make a String to hold incoming data from the client
while (client.connected()) { // loop while the client's connected
if (client.available()) { // if there's bytes to read from the client,
char c = client.read(); // read a byte, then
Serial.write(c); // print it out the serial monitor
if (c == '\n') { // if the byte is a newline character
// if the current line is blank, you got two newline characters in a row.
// that's the end of the client HTTP request, so send a response:
if (currentLine.length() == 0) {
// Send header
client.println("HTTP/1.1 200 OK");
client.println("Content-type:text/html");
client.println("Connection: close");
client.println();
// Display the HTML web page
client.println(responseHTML);
// The HTTP response ends with another blank line
client.println();
break;
} else { // if we got a newline, then clear currentLine
currentLine = "";
}
} else if (c != '\r') { // if we got anything else but a carriage return character,
currentLine += c; // add it to the end of the currentLine
}
}
}
// Close the connection
client.stop();
showConnectionsCount();
}
}
При запуске программы на экране будет отображено имя точки доступа и IP-адрес. Подключившись со смартфона к точке доступа, можно в браузере набрать IP и увидеть содержимое web-страницы.
Сервер будет работать и без OLED-экрана, в этом случае отладочную информацию можно смотреть с помощью Serial Monitor в Arduino IDE.
3. WiFi точка доступа с DNS
Предыдущий пример можно улучшить, если активировать поддержку DNS. В этом случае не придется вбивать IP, вместо него можно использовать полноценное имя, например

В исходнике используется класс
#include
#include
#include
WebServer webServer(80);
const char *ssid = "TEST-123";
const char *password = NULL; // "12345678";
IPAddress apIP(192, 168, 1, 4);
DNSServer dnsServer;
const char *server_name = "
String responseHTML = "DOCTYPE html>"
""
""
"
ESP32 Web Server
"
"
Hello World
"
"";
void setup() {
WiFi.mode(WIFI_AP);
WiFi.softAP(ssid, password);
delay(100);
WiFi.softAPConfig(apIP, apIP, IPAddress(255, 255, 255, 0));
const byte DNS_PORT = 53;
dnsServer.start(DNS_PORT, server_name, apIP);
webServer.onNotFound([]() {
webServer.send(200, "text/html", responseHTML);
});
webServer.begin();
}
void loop() {
dnsServer.processNextRequest();
webServer.handleClient();
}
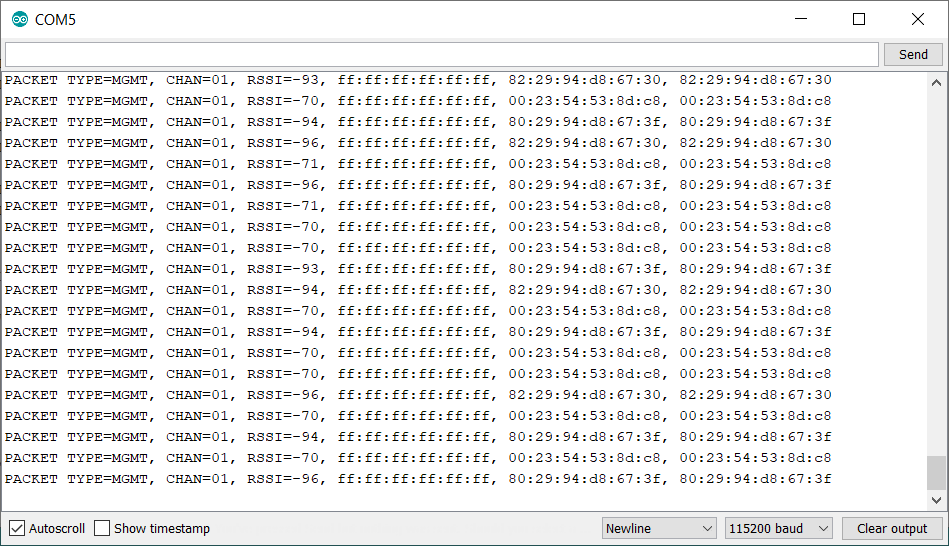
4. WiFI Sniffer
Еще один интересный пример использования кода приведен на странице
Это может пригодиться например, для «умного дома», чтобы узнать когда владелец вернулся домой. Некоторые компании используют MAC-адреса устройств для
Исходный код можно скачать со страницы
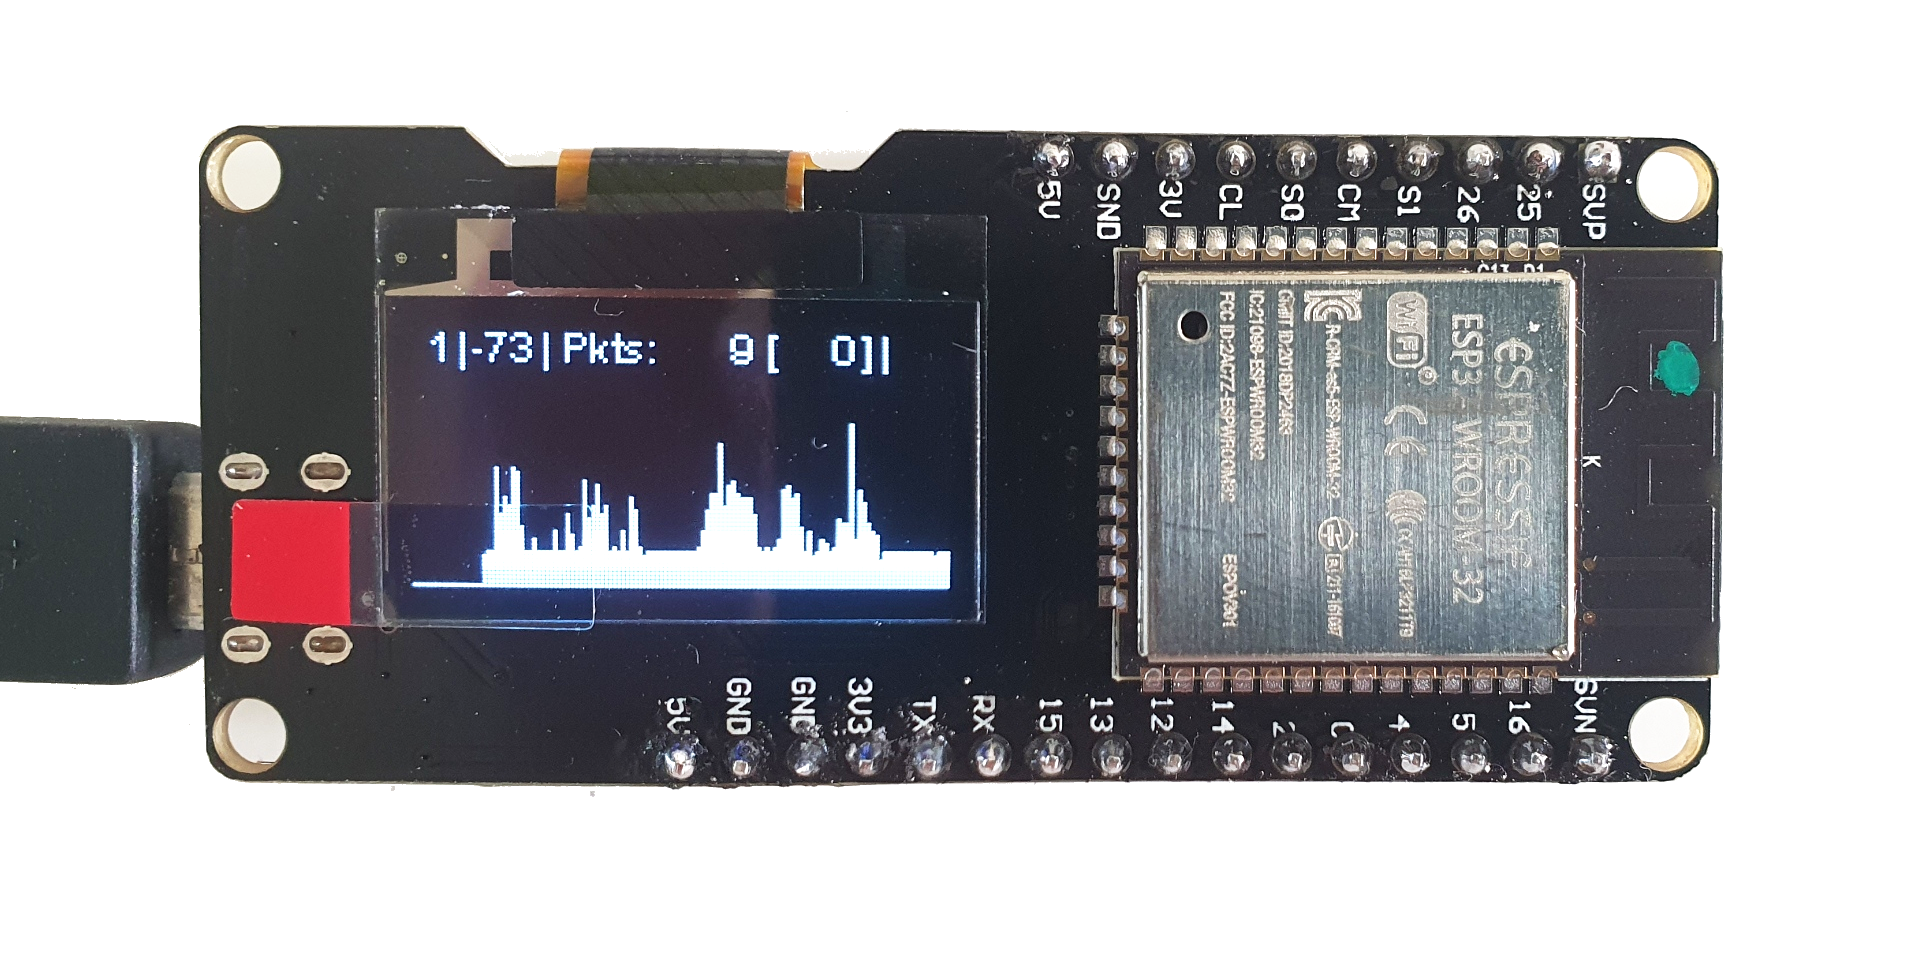
5. WiFi Packet Monitor
Еще один интересный пример использования promiscuous mode — это графический мониторинг активности канала, также как и в предыдущем случае подключения к самой сети не требуется.
Исходный код был взят на либо посылкой соответствующего числа через Serial Monitor в Arduino IDE.
Исходный код
#include
#include
#include
#include
#include
#include
#include
#include
#include
#include
#include
using namespace std;
#define MAX_CH 14 // 1 - 14
#define SNAP_LEN 2324 // max len of each recieved packet
#define BUTTON_PIN 5 // button to change the channel
#define USE_DISPLAY // comment out if you don't want to use OLED
//#define FLIP_DISPLAY // comment out if you don't like to flip it
#define MAX_X 128
#define MAX_Y 64
#if CONFIG_FREERTOS_UNICORE
#define RUNNING_CORE 0
#else
#define RUNNING_CORE 1
#endif
#ifdef USE_DISPLAY
#include
#endif
esp_err_t event_handler(void* ctx, system_event_t* event) {
return ESP_OK;
}
// OLED Display 128x64
#ifdef USE_DISPLAY
SSD1306Wire display(0x3c, 5, 4);
#endif
Preferences preferences;
bool useSD = false;
bool buttonPressed = false;
bool buttonEnabled = true;
uint32_t lastDrawTime;
uint32_t lastButtonTime;
uint32_t tmpPacketCounter;
uint32_t pkts[MAX_X]; // here the packets per second will be saved
uint32_t deauths = 0; // deauth frames per second
unsigned int ch = 1; // current 802.11 channel
int rssiSum;
/* ===== functions ===== */
double getMultiplicator() {
uint32_t maxVal = 1;
for (int i = 0; i < MAX_X; i++) {
if (pkts > maxVal) maxVal = pkts;
}
if (maxVal > MAX_Y) return (double)MAX_Y / (double)maxVal;
else return 1;
}
void setChannel(int newChannel) {
ch = newChannel;
if (ch > MAX_CH || ch < 1) ch = 1;
preferences.begin("packetmonitor32", false);
preferences.putUInt("channel", ch);
preferences.end();
esp_wifi_set_promiscuous(false);
esp_wifi_set_channel(ch, WIFI_SECOND_CHAN_NONE);
esp_wifi_set_promiscuous_rx_cb(&wifi_promiscuous);
esp_wifi_set_promiscuous(true);
}
void wifi_promiscuous(void* buf, wifi_promiscuous_pkt_type_t type) {
wifi_promiscuous_pkt_t* pkt = (wifi_promiscuous_pkt_t*)buf;
wifi_pkt_rx_ctrl_t ctrl = (wifi_pkt_rx_ctrl_t)pkt->rx_ctrl;
if (type == WIFI_PKT_MGMT && (pkt->payload[0] == 0xA0 || pkt->payload[0] == 0xC0 )) deauths++;
if (type == WIFI_PKT_MISC) return; // wrong packet type
if (ctrl.sig_len > SNAP_LEN) return; // packet too long
uint32_t packetLength = ctrl.sig_len;
if (type == WIFI_PKT_MGMT) packetLength -= 4; // fix for known bug in the IDF
//Serial.print(".");
tmpPacketCounter++;
rssiSum += ctrl.rssi;
}
void draw() {
#ifdef USE_DISPLAY
double multiplicator = getMultiplicator();
int len;
int rssi;
if (pkts[MAX_X - 1] > 0) rssi = rssiSum / (int)pkts[MAX_X - 1];
else rssi = rssiSum;
display.clear();
display.setTextAlignment(TEXT_ALIGN_RIGHT);
display.drawString( 10, 0, (String)ch);
display.drawString( 14, 0, ("|"));
display.drawString( 30, 0, (String)rssi);
display.drawString( 34, 0, ("|"));
display.drawString( 82, 0, (String)tmpPacketCounter);
display.drawString( 87, 0, ("["));
display.drawString(106, 0, (String)deauths);
display.drawString(110, 0, ("]"));
display.drawString(114, 0, ("|"));
display.drawString(128, 0, (useSD ? "SD" : ""));
display.setTextAlignment(TEXT_ALIGN_LEFT);
display.drawString( 36, 0, ("Pkts:"));
display.drawLine(0, 63 - MAX_Y, MAX_X, 63 - MAX_Y);
for (int i = 0; i < MAX_X; i++) {
len = pkts * multiplicator;
display.drawLine(i, 63, i, 63 - (len > MAX_Y ? MAX_Y : len));
if (i < MAX_X - 1) pkts = pkts[i + 1];
}
display.display();
#endif
}
void setup() {
// Serial
Serial.begin(115200);
// Settings
preferences.begin("packetmonitor32", false);
ch = preferences.getUInt("channel", 1);
preferences.end();
// System & WiFi
nvs_flash_init();
tcpip_adapter_init();
wifi_init_config_t cfg = WIFI_INIT_CONFIG_DEFAULT();
ESP_ERROR_CHECK(esp_event_loop_init(event_handler, NULL));
ESP_ERROR_CHECK(esp_wifi_init(&cfg));
//ESP_ERROR_CHECK(esp_wifi_set_country(WIFI_COUNTRY_EU));
ESP_ERROR_CHECK(esp_wifi_set_storage(WIFI_STORAGE_RAM));
ESP_ERROR_CHECK(esp_wifi_set_mode(WIFI_MODE_NULL));
ESP_ERROR_CHECK(esp_wifi_start());
esp_wifi_set_channel(ch, WIFI_SECOND_CHAN_NONE);
// I/O
pinMode(BUTTON_PIN, INPUT_PULLUP);
// display
#ifdef USE_DISPLAY
display.init();
#ifdef FLIP_DISPLAY
display.flipScreenVertically();
#endif
/* show start screen */
display.clear();
display.setFont(ArialMT_Plain_16);
display.drawString(6, 6, "PacketMonitor32");
display.setFont(ArialMT_Plain_10);
display.drawString(24, 34, "Made with / second core
xTaskCreatePinnedToCore(
coreTask, /* Function to implement the task */
"coreTask", /* Name of the task */
2500, /* Stack size in words */
NULL, /* Task input parameter */
0, /* Priority of the task */
NULL, /* Task handle. */
RUNNING_CORE); /* Core where the task should run */
// start Wifi sniffer
esp_wifi_set_promiscuous_rx_cb(&wifi_promiscuous);
esp_wifi_set_promiscuous(true);
}
void loop() {
vTaskDelay(portMAX_DELAY);
}
void coreTask( void * p ) {
uint32_t currentTime;
while(true) {
currentTime = millis();
// check button
if (digitalRead(BUTTON_PIN) == LOW) {
if (buttonEnabled) {
if (!buttonPressed) {
buttonPressed = true;
lastButtonTime = currentTime;
} else if (currentTime - lastButtonTime >= 2000) {
draw();
buttonPressed = false;
buttonEnabled = false;
}
}
} else {
if (buttonPressed) {
setChannel(ch + 1);
draw();
}
buttonPressed = false;
buttonEnabled = true;
}
// draw Display
if ( currentTime - lastDrawTime > 1000 ) {
lastDrawTime = currentTime;
// Serial.printf("\nFree RAM %u %u\n", heap_caps_get_minimum_free_size(MALLOC_CAP_8BIT), heap_caps_get_minimum_free_size(MALLOC_CAP_32BIT));// for debug purposes
pkts[MAX_X - 1] = tmpPacketCounter;
draw();
Serial.println((String)pkts[MAX_X - 1]);
tmpPacketCounter = 0;
deauths = 0;
rssiSum = 0;
}
// Serial input
if (Serial.available()) {
ch = Serial.readString().toInt();
if (ch < 1 || ch > 14) ch = 1;
setChannel(ch);
}
}
}
Одна плата ESP32 может мониторить только 1 канал, но при дешевизне плат вполне можно сделать
Заключение
Как можно видеть, в плане соотношения возможностей и цены, ESP32 довольно интересны, и в любом случае, намного функциональнее обычных Arduino. Эксперименты с WiFi также довольно занимательны, на плате можно держать не только вполне функционирующий веб-сервер (даже с поддержкой
В целом, модули ESP32 интересны тогда, когда возможностей Arduino уже не хватает, а использовать Raspberry Pi с Linux еще избыточно. Кстати, вычислительные возможности ESP32 позволяют использовать даже модуль камеры, так что плату можно использовать в качестве беспроводного видеозвонка или прототипа для домашней системы видеонаблюдения.
ESP32 с камерой

Всем удачных экспериментов.
Платы ESP32 весьма популярны в виду низкой цены, неплохой вычислительной мощности (процессор 200МГц), развитого SDK с поддержкой как MicroPython так и Arduino IDE, наличием GPIO c поддержкой периферии (SPI, I2C и пр) и беспроводной связи (WiFi, Bluetooth). Сегодня мы посмотрим, что можно сделать на такой плате ценой всего лишь около 12$.
Мы рассмотрим разные варианты использования WiFi, от простого коннекта к сети до WiFi-сниффера. Для тестов понадобится любая плата с ESP32 (лучше с OLED-экраном, как на картинке) и Arduino IDE.
Для тех кому интересно как это работает, продолжение под катом.
Я не буду писать, как подключить библиотеки ESP32 к Arduino IDE, желающие могут посмотреть
You must be registered for see links
. Отмечу лишь, что у данной платы есть особенность — для загрузки кода из Arduino IDE нужно во время заливки нажать и подержать кнопку Boot. В остальном, использование платы ничем не отличается от обычных Arduino.Теперь приступим к коду. Все примеры кода полностью готовы к использованию, их можно просто скопировать и вставить в Arduino IDE.
1. Подключение к WiFi и получение точного времени
Раз уж на плате есть WiFi, самое простое что мы можем сделать, это подключиться к существующей WiFi-сети. Это общеизвестно, и работало еще на ESP8266. Однако просто так подключиться и ничего не делать неинтересно, покажем как загрузить точное время по NTP. С помощью нижеприведенного кода нашу плату с ESP несложно превратить в настольные (или для гиков 100lvl наручные
часы.
Код довольно прост, интересно что поддержка NTP уже встроена в стандартные библиотеки, и ничего доустанавливать не нужно. Для работы OLED-экрана нужно установить библиотеку
You must be registered for see links
.Переменные ssid и password нужно будет заменить на параметры реальной точки доступа, в остальном, все работает «из коробки».
#include
#include
#include
const char* ssid = "MYWIFI";
const char* password = "12345678";
const char* ntpServer = "pool.ntp.org";
const long gmtOffset_sec = 3600;
const int daylightOffset_sec = 3600;
// OLED Display 128x64
SSD1306Wire display(0x3c, 5, 4);
void setup() {
Serial.begin(115200);
delay(10);
Serial.println('\n');
WiFi.begin(ssid, password); // Connect to the network
while (WiFi.status() != WL_CONNECTED) { // Wait for the Wi-Fi to connect
delay(500);
Serial.print('.');
}
Serial.println('\n');
Serial.println("Connection established");
Serial.print("IP address:\t");
Serial.println(WiFi.localIP());
// Get the NTP time
configTime(gmtOffset_sec, daylightOffset_sec, ntpServer);
// OLED display init
display.init();
display.clear();
display.setTextAlignment(TEXT_ALIGN_LEFT);
display.setFont(ArialMT_Plain_10);
display.drawString(0, 0, "Access Point connected");
display.drawString(0, 24, "AP IP address: ");
display.drawString(0, 36, WiFi.localIP().toString());
display.display();
delay(1000);
}
void draw_time(char *msg) {
display.clear();
display.setTextAlignment(TEXT_ALIGN_CENTER);
display.setFont(ArialMT_Plain_24);
display.drawString(display.getWidth()/2, 0, msg);
display.display();
Serial.println(msg);
}
void loop() {
struct tm timeinfo;
if (getLocalTime(&timeinfo)) {
char time_str[16];
strftime(time_str, 16, "%H:%M:%S", &timeinfo);
draw_time(time_str);
}
delay(500);
}
2. WiFi точка доступа
Разумеется, мы можем не только подключиться к точке доступа, но и создать свою. В данном примере мы запустим мини веб-сервер, открый который можно например, со смартфона. Отдельно можно отметить обработку события SYSTEM_EVENT_AP_STACONNECTED, что позволяет узнать, сколько клиентов подключалось к нашей точке доступа.
Фото того, как это работает, показано на КДПВ.
#include
#include
#include
// Access Point credentials
const char *ssid = "TEST-123";
const char *password = NULL; // "12345678";
int connections = 0;
// Onboard WiFi server
WiFiServer server(80);
String responseHTML = "DOCTYPE html>"
""
""
"
ESP32 Web Server
"
"
Hello World
"
"";
// OLED Display 128x64
SSD1306Wire display(0x3c, 5, 4);
void WiFiStationConnected(WiFiEvent_t event, WiFiEventInfo_t info){
connections += 1;
showConnectionsCount();
}
void showConnectionsCount() {
char data[32];
sprintf(data, "Connections: %d", connections);
draw_message(data);
}
void setup() {
Serial.begin(115200);
Serial.println();
Serial.println("Configuring access point...");
// Start access point
WiFi.mode(WIFI_AP);
WiFi.softAP(ssid, password);
WiFi.onEvent(WiFiStationConnected, SYSTEM_EVENT_AP_STACONNECTED);
IPAddress ip_address = WiFi.softAPIP(); //IP Address of our accesspoint
// Start web server
server.begin();
Serial.print("AP IP address: ");
Serial.println(ip_address);
// Oled display
display.init();
// Draw info
display.clear();
display.setTextAlignment(TEXT_ALIGN_LEFT);
display.setFont(ArialMT_Plain_10);
display.drawString(0, 0, "Access Point started");
display.drawString(0, 12, ssid);
display.drawString(0, 24, "AP IP address: ");
display.drawString(0, 36, ip_address.toString());
display.display();
// Total number of connections
showConnectionsCount();
}
void draw_message(char *msg) {
display.setColor(BLACK);
display.fillRect(0, 50, display.getWidth(), 12);
display.setColor(WHITE);
display.drawString(0, 50, msg);
display.display();
Serial.println(msg);
}
void loop() {
WiFiClient client = server.available(); // Listen for incoming clients
if (client) { // If a new client connects,
draw_message("Client connected");
String currentLine = ""; // make a String to hold incoming data from the client
while (client.connected()) { // loop while the client's connected
if (client.available()) { // if there's bytes to read from the client,
char c = client.read(); // read a byte, then
Serial.write(c); // print it out the serial monitor
if (c == '\n') { // if the byte is a newline character
// if the current line is blank, you got two newline characters in a row.
// that's the end of the client HTTP request, so send a response:
if (currentLine.length() == 0) {
// Send header
client.println("HTTP/1.1 200 OK");
client.println("Content-type:text/html");
client.println("Connection: close");
client.println();
// Display the HTML web page
client.println(responseHTML);
// The HTTP response ends with another blank line
client.println();
break;
} else { // if we got a newline, then clear currentLine
currentLine = "";
}
} else if (c != '\r') { // if we got anything else but a carriage return character,
currentLine += c; // add it to the end of the currentLine
}
}
}
// Close the connection
client.stop();
showConnectionsCount();
}
}
При запуске программы на экране будет отображено имя точки доступа и IP-адрес. Подключившись со смартфона к точке доступа, можно в браузере набрать IP и увидеть содержимое web-страницы.
Сервер будет работать и без OLED-экрана, в этом случае отладочную информацию можно смотреть с помощью Serial Monitor в Arduino IDE.
3. WiFi точка доступа с DNS
Предыдущий пример можно улучшить, если активировать поддержку DNS. В этом случае не придется вбивать IP, вместо него можно использовать полноценное имя, например
You must be registered for see links
.
В исходнике используется класс
You must be registered for see links
, который позволяет сделать код обработки запросов гораздо короче.#include
#include
#include
WebServer webServer(80);
const char *ssid = "TEST-123";
const char *password = NULL; // "12345678";
IPAddress apIP(192, 168, 1, 4);
DNSServer dnsServer;
const char *server_name = "
You must be registered for see links
"; // Can be "*" to all DNS requestsString responseHTML = "DOCTYPE html>"
""
""
"
ESP32 Web Server
"
"
Hello World
"
"";
void setup() {
WiFi.mode(WIFI_AP);
WiFi.softAP(ssid, password);
delay(100);
WiFi.softAPConfig(apIP, apIP, IPAddress(255, 255, 255, 0));
const byte DNS_PORT = 53;
dnsServer.start(DNS_PORT, server_name, apIP);
webServer.onNotFound([]() {
webServer.send(200, "text/html", responseHTML);
});
webServer.begin();
}
void loop() {
dnsServer.processNextRequest();
webServer.handleClient();
}
4. WiFI Sniffer
Еще один интересный пример использования кода приведен на странице
You must be registered for see links
. WiFi на ESP32 можно перевести в так называемый promiscuous mode, что позволяет незаметно мониторить пакеты WiFi, не подключаясь к самой сети. В частности, можно видеть MAC-адреса находящихся поблизости устройств:
Это может пригодиться например, для «умного дома», чтобы узнать когда владелец вернулся домой. Некоторые компании используют MAC-адреса устройств для
You must be registered for see links
, чтобы потом показывать им в гугле таргетированную рекламу.Исходный код можно скачать со страницы
You must be registered for see links
.5. WiFi Packet Monitor
Еще один интересный пример использования promiscuous mode — это графический мониторинг активности канала, также как и в предыдущем случае подключения к самой сети не требуется.
Исходный код был взят на
You must be registered for see links
, из него была убрана поддержка записи на SD (на плате её нет) и был исправлен баг с графической библиотекой. Переключать номер канала для мониторинга можно либо нажатием кнопки (на плате её нет либо посылкой соответствующего числа через Serial Monitor в Arduino IDE.Исходный код
#include
#include
#include
#include
#include
#include
#include
#include
#include
#include
#include
using namespace std;
#define MAX_CH 14 // 1 - 14
#define SNAP_LEN 2324 // max len of each recieved packet
#define BUTTON_PIN 5 // button to change the channel
#define USE_DISPLAY // comment out if you don't want to use OLED
//#define FLIP_DISPLAY // comment out if you don't like to flip it
#define MAX_X 128
#define MAX_Y 64
#if CONFIG_FREERTOS_UNICORE
#define RUNNING_CORE 0
#else
#define RUNNING_CORE 1
#endif
#ifdef USE_DISPLAY
#include
#endif
esp_err_t event_handler(void* ctx, system_event_t* event) {
return ESP_OK;
}
// OLED Display 128x64
#ifdef USE_DISPLAY
SSD1306Wire display(0x3c, 5, 4);
#endif
Preferences preferences;
bool useSD = false;
bool buttonPressed = false;
bool buttonEnabled = true;
uint32_t lastDrawTime;
uint32_t lastButtonTime;
uint32_t tmpPacketCounter;
uint32_t pkts[MAX_X]; // here the packets per second will be saved
uint32_t deauths = 0; // deauth frames per second
unsigned int ch = 1; // current 802.11 channel
int rssiSum;
/* ===== functions ===== */
double getMultiplicator() {
uint32_t maxVal = 1;
for (int i = 0; i < MAX_X; i++) {
if (pkts > maxVal) maxVal = pkts;
}
if (maxVal > MAX_Y) return (double)MAX_Y / (double)maxVal;
else return 1;
}
void setChannel(int newChannel) {
ch = newChannel;
if (ch > MAX_CH || ch < 1) ch = 1;
preferences.begin("packetmonitor32", false);
preferences.putUInt("channel", ch);
preferences.end();
esp_wifi_set_promiscuous(false);
esp_wifi_set_channel(ch, WIFI_SECOND_CHAN_NONE);
esp_wifi_set_promiscuous_rx_cb(&wifi_promiscuous);
esp_wifi_set_promiscuous(true);
}
void wifi_promiscuous(void* buf, wifi_promiscuous_pkt_type_t type) {
wifi_promiscuous_pkt_t* pkt = (wifi_promiscuous_pkt_t*)buf;
wifi_pkt_rx_ctrl_t ctrl = (wifi_pkt_rx_ctrl_t)pkt->rx_ctrl;
if (type == WIFI_PKT_MGMT && (pkt->payload[0] == 0xA0 || pkt->payload[0] == 0xC0 )) deauths++;
if (type == WIFI_PKT_MISC) return; // wrong packet type
if (ctrl.sig_len > SNAP_LEN) return; // packet too long
uint32_t packetLength = ctrl.sig_len;
if (type == WIFI_PKT_MGMT) packetLength -= 4; // fix for known bug in the IDF
You must be registered for see links
//Serial.print(".");
tmpPacketCounter++;
rssiSum += ctrl.rssi;
}
void draw() {
#ifdef USE_DISPLAY
double multiplicator = getMultiplicator();
int len;
int rssi;
if (pkts[MAX_X - 1] > 0) rssi = rssiSum / (int)pkts[MAX_X - 1];
else rssi = rssiSum;
display.clear();
display.setTextAlignment(TEXT_ALIGN_RIGHT);
display.drawString( 10, 0, (String)ch);
display.drawString( 14, 0, ("|"));
display.drawString( 30, 0, (String)rssi);
display.drawString( 34, 0, ("|"));
display.drawString( 82, 0, (String)tmpPacketCounter);
display.drawString( 87, 0, ("["));
display.drawString(106, 0, (String)deauths);
display.drawString(110, 0, ("]"));
display.drawString(114, 0, ("|"));
display.drawString(128, 0, (useSD ? "SD" : ""));
display.setTextAlignment(TEXT_ALIGN_LEFT);
display.drawString( 36, 0, ("Pkts:"));
display.drawLine(0, 63 - MAX_Y, MAX_X, 63 - MAX_Y);
for (int i = 0; i < MAX_X; i++) {
len = pkts * multiplicator;
display.drawLine(i, 63, i, 63 - (len > MAX_Y ? MAX_Y : len));
if (i < MAX_X - 1) pkts = pkts[i + 1];
}
display.display();
#endif
}
void setup() {
// Serial
Serial.begin(115200);
// Settings
preferences.begin("packetmonitor32", false);
ch = preferences.getUInt("channel", 1);
preferences.end();
// System & WiFi
nvs_flash_init();
tcpip_adapter_init();
wifi_init_config_t cfg = WIFI_INIT_CONFIG_DEFAULT();
ESP_ERROR_CHECK(esp_event_loop_init(event_handler, NULL));
ESP_ERROR_CHECK(esp_wifi_init(&cfg));
//ESP_ERROR_CHECK(esp_wifi_set_country(WIFI_COUNTRY_EU));
ESP_ERROR_CHECK(esp_wifi_set_storage(WIFI_STORAGE_RAM));
ESP_ERROR_CHECK(esp_wifi_set_mode(WIFI_MODE_NULL));
ESP_ERROR_CHECK(esp_wifi_start());
esp_wifi_set_channel(ch, WIFI_SECOND_CHAN_NONE);
// I/O
pinMode(BUTTON_PIN, INPUT_PULLUP);
// display
#ifdef USE_DISPLAY
display.init();
#ifdef FLIP_DISPLAY
display.flipScreenVertically();
#endif
/* show start screen */
display.clear();
display.setFont(ArialMT_Plain_16);
display.drawString(6, 6, "PacketMonitor32");
display.setFont(ArialMT_Plain_10);
display.drawString(24, 34, "Made with / second core
xTaskCreatePinnedToCore(
coreTask, /* Function to implement the task */
"coreTask", /* Name of the task */
2500, /* Stack size in words */
NULL, /* Task input parameter */
0, /* Priority of the task */
NULL, /* Task handle. */
RUNNING_CORE); /* Core where the task should run */
// start Wifi sniffer
esp_wifi_set_promiscuous_rx_cb(&wifi_promiscuous);
esp_wifi_set_promiscuous(true);
}
void loop() {
vTaskDelay(portMAX_DELAY);
}
void coreTask( void * p ) {
uint32_t currentTime;
while(true) {
currentTime = millis();
// check button
if (digitalRead(BUTTON_PIN) == LOW) {
if (buttonEnabled) {
if (!buttonPressed) {
buttonPressed = true;
lastButtonTime = currentTime;
} else if (currentTime - lastButtonTime >= 2000) {
draw();
buttonPressed = false;
buttonEnabled = false;
}
}
} else {
if (buttonPressed) {
setChannel(ch + 1);
draw();
}
buttonPressed = false;
buttonEnabled = true;
}
// draw Display
if ( currentTime - lastDrawTime > 1000 ) {
lastDrawTime = currentTime;
// Serial.printf("\nFree RAM %u %u\n", heap_caps_get_minimum_free_size(MALLOC_CAP_8BIT), heap_caps_get_minimum_free_size(MALLOC_CAP_32BIT));// for debug purposes
pkts[MAX_X - 1] = tmpPacketCounter;
draw();
Serial.println((String)pkts[MAX_X - 1]);
tmpPacketCounter = 0;
deauths = 0;
rssiSum = 0;
}
// Serial input
if (Serial.available()) {
ch = Serial.readString().toInt();
if (ch < 1 || ch > 14) ch = 1;
setChannel(ch);
}
}
}
Одна плата ESP32 может мониторить только 1 канал, но при дешевизне плат вполне можно сделать
You must be registered for see links
.Заключение
Как можно видеть, в плане соотношения возможностей и цены, ESP32 довольно интересны, и в любом случае, намного функциональнее обычных Arduino. Эксперименты с WiFi также довольно занимательны, на плате можно держать не только вполне функционирующий веб-сервер (даже с поддержкой
You must be registered for see links
), но и изучить работу WiFi и MAC более детально.В целом, модули ESP32 интересны тогда, когда возможностей Arduino уже не хватает, а использовать Raspberry Pi с Linux еще избыточно. Кстати, вычислительные возможности ESP32 позволяют использовать даже модуль камеры, так что плату можно использовать в качестве беспроводного видеозвонка или прототипа для домашней системы видеонаблюдения.
ESP32 с камерой
Всем удачных экспериментов.